Difference between revisions of "JupyterHub"
| Line 79: | Line 79: | ||
Link the environment to a Jupyter kernel: | Link the environment to a Jupyter kernel: | ||
<pre> | <pre> | ||
| − | (/path/to/predefined/environment) [neissner@td110 ~]$ | + | (/path/to/predefined/environment) [neissner@td110 ~]$ ipykernel install --user --name=whatever_kernel_name |
Installed kernelspec whatever_kernel_name in /nfs/pic.es/user/n/neissner/.local/share/jupyter/kernels/whatever_kernel_name | Installed kernelspec whatever_kernel_name in /nfs/pic.es/user/n/neissner/.local/share/jupyter/kernels/whatever_kernel_name | ||
</pre> | </pre> | ||
Revision as of 13:36, 18 March 2020
Introduction
PIC offers a service for running Jupyter notebooks on CPU or GPU resources. This service is primarily thought for code developing or prototyping rather than data processing. The usage is similar to running notebooks on your personal computer but offers the advantage of developing and testing your code on different hardware configurations.
Since the service is strictly thought for development and small scale testing tasks, sessions a shutdown policy in place:
- The maximum duration for a session is 48h.
- After an idle period of 2 hours, the session will be closed.
In practice that means that you should estimate the test data volume that you work with during a session to be able to be processed in less than 48 hours.
How to connect to the service
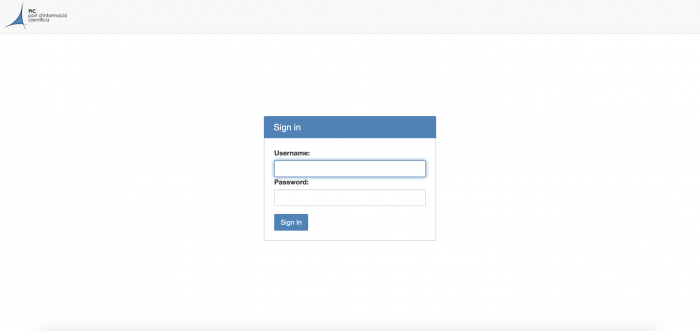
Got to jupyter01.pic.es to see your login screen.
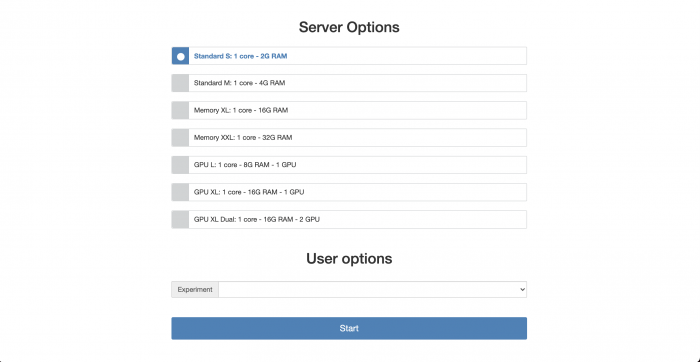
Sign in with your PIC user credentials. This will prompt you to the following screen.
Here you can choose the hardware configuration for your Jupyter session. After choosing a configuration and pressing start the next screen will show you the progress of the initialisation process. Keep in mind that a job containing your Jupyter session is actually sent to the HTCondor queuing system and waiting for available resources before being started. This usually takes less than a minute but can take up to a few depending on our resource usage.
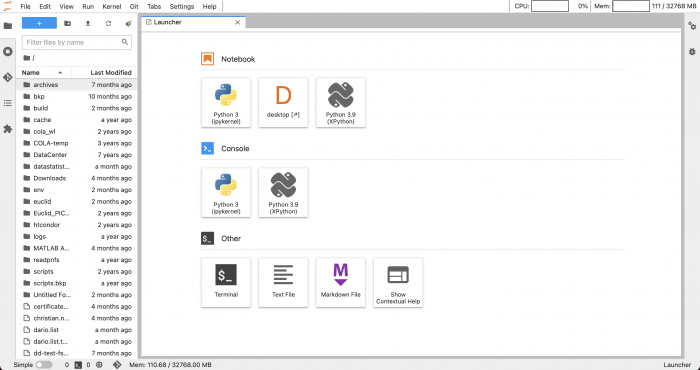
In the next screen you can choose the tool that you want to use for your work: a Python notebook, a Python console or a plain bash terminal.
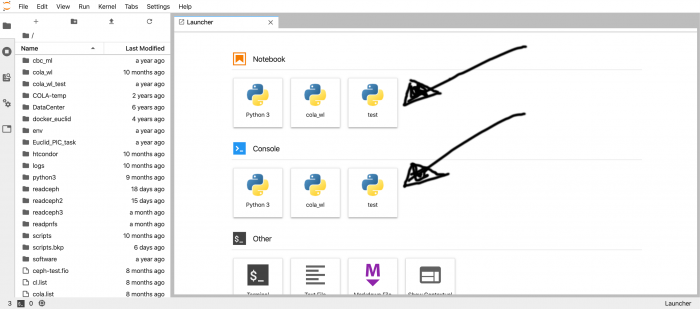
Your python environments should appear under Notebook and Console headers. In a later section we will show you how to create a new environment and to remove an existing one.
Terminate your session and logout
It is important that before you log out you terminate your job. In order to do so, go to the top page menu "File -> Hub Control Panel" and you will see the following screen.
Here click on the Stop My Server button. After that you can log out by clicking the logout button in the right upper corner.
Python virtual environments
On the homepage of your Jupyter session, click on the terminal button on the session dashboard on the right to open a bash terminal.
Initialize conda
If you use conda for the first time in your home, you have to initialize conda. For the path to an available conda installation, please get in contact with your project liaison at PIC.
First, let's initialize conda for our bash sessions:
[neissner@td110 ~]$ eval "$(/path/to/anaconda/bin/conda shell.bash hook)"
[neissner@td110 ~]$ conda init
This actually changes the .bashrc file in your home directory in order to activate the base environment on login. To avoid that the base environment is activated every time you log on to a node, run:
[neissner@td110 ~]$ conda config --set auto_activate_base false
For now you can exit the terminal.
[neissner@td110 ~]$ exit
Bind existing environments to a Jupyter kernel
If you want to know which environments are available for your project, please contact your project liaison at PIC. Although, you might find instructions on how to create your own environments, we would like to encourage the use of the predefined environments. The main reason is the sheer size of a conda environment which reaches easily several GB.
Log into Jupyter, start a session. From the session dashboard choose the bash terminal.
Inside the terminal, activate your environment:
[neissner@td110 ~]$ conda activate /path/to/predefined/environment
(/path/to/predefined/environment) [neissner@td110 ~]$
Link the environment to a Jupyter kernel:
(/path/to/predefined/environment) [neissner@td110 ~]$ ipykernel install --user --name=whatever_kernel_name
Installed kernelspec whatever_kernel_name in /nfs/pic.es/user/n/neissner/.local/share/jupyter/kernels/whatever_kernel_name
Deactivate your environment:
(/path/to/predefined/environment) [neissner@td110 ~]$ conda deactivate
Now you can exit the terminal. After refreshing the Jupyter page your whatever_kernel_name appears in the dashboard. In this example test has been used for whatever_kernel_name
Remove Jupyter kernel
Log onto Jupyter, start a session and from the session dashboard choose the bash terminal. To remove your environment/kernel from Jupyter run:
[neissner@td110 ~]$ jupyter kernelspec uninstall whatever_kernel_name
Kernel specs to remove:
  whatever_kernel_name                  /nfs/pic.es/user/n/neissner/.local/share/jupyter/kernels/whatever_kernel_name
Remove 1 kernel specs [y/N]: y
[RemoveKernelSpec] Removed /nfs/pic.es/user/n/neissner/.local/share/jupyter/kernels/whatever_kernel_name
Keep in mind that, although not available in Jupyter anymore, the environment still exists. Whenever you need it, you can link it again.


